ActiveMerchant 分析和案例实践
这篇文章主要涉及到以下一些内容:
- 了解 ActiveMrechant 中比较重要的 API。
- 了解 ActiveMerchant 的架构。
- 基于 Spree 的 ActiveMerchant 集成案例。
1. ActiveMerchant API’s
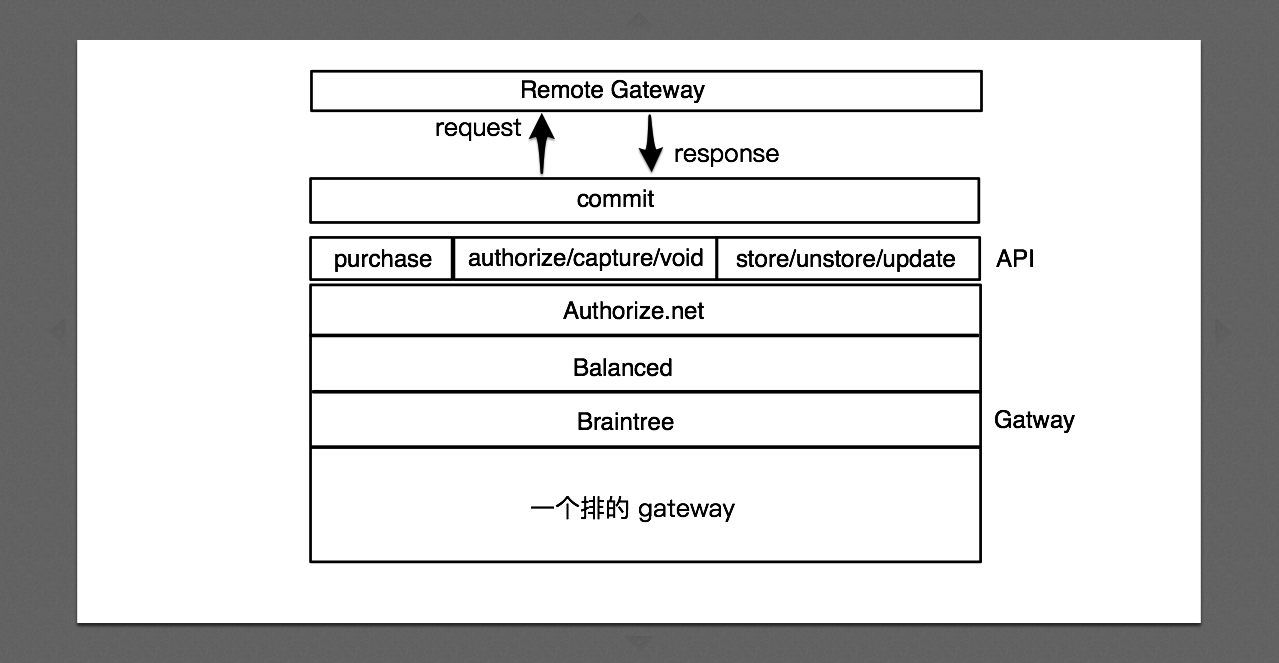
ActiveMerchant 最核心的两个概念是 gateway 和 credit card, 然后围绕这两个核心概念构建了一系列工具,比如签名,加密,认证,报文发送,报文响应等。 每一个具体的 gateway 都是从 ActiveMerchant::Billing::Gatwway 这个基类继承出来,然后根据各自支付网关的具体要求实现自己的 purchase, authorize, capture, void, refund, verify, store, unstore, update, credit 等 API。
现在我们挑选其中最重要的几个 API 来讲解下。
1.1 purchase
并不是每一个网关都能提供上述 10 个 API 所需要的功能, 但是 purchase 是一个支付网关最低限度需要支持的 API, 它接受 3 个参数分别是, amount, payment_method 和 options。
def purchase(amount, payment_method, options={}) #=> Response
amount 即支付金额,需要是一个整数,以所支付货币的最小划分为单位, 如果支付的是 USD 或者 RMB, 则 amount 表示整数的分。
payment_method 即远程支付网关需要处理的支付对象, payment_method 支持以下 4 种类型:
- CreditCart 即信用卡, ActiveMerchant 提供了 ActiveMerchant::Billing::CreditCard 这个类来生成 credit card。
在 ActiveMerchant 中创建一张信用卡是一件比较简单的事情比如我们可以这样做,
credit_card = ActiveMerchant::Billing::CreditCard.new(
  :number => number,
  :month  => 10,
  :year  => 2010,
  :first_name => 'Bob',
  :last_name  => 'Smith',
  :verification_value => '111', #verification codes are now required
  :type => 'visa'
)
-
BankAccount 这个是银行账户,但是在实际开发中一直没有用过此类支付方式,估计和信用卡的用法差不多。
-
String/token 即支付令牌,支付令牌怎么拿到呢? 其实就是你将用户的信用卡或者银行账户提交给远程支付网关,然后远程网关将支付令牌发给你,这样以后的支付你通过这个令牌就能完成了,这个和国内的微信,支付宝绑定银行卡,信用卡差不多。
-
String/identifier 即交易事务标识符, 相当于给某笔交易生成的一个 ID, 这个支付参数的使用场景是这样的,假设我们在前面成功地提交了一笔交易事务,然后得到一个关于此交易事务的标识符,然后我们又需要对这一笔交易进行操作(可能是取消,退款或者完成),此时我们只需要将此支付标识符提交给远程支付网关就能操作(可能是取消,退款或者完成)这一笔交易。
1.2 authorize/capture/void
这三个 API 我们放在一起讲,因为这三个 API 往往是放在一起调用的。
在介绍这三个 API 的用法之前,我们先看看下面三段有点二的对话。
对话 1,
甲: 我要给你 100 元钱,你要不要? (Authorize Request)
乙: 好的,我先在我的小本本上记下: 甲要给我 100 元钱。 (Authorize Response)
甲: 好的,给你,接好这 100 元钱。 (Capture Request)
乙: 好的,我拿到这 100 元钱了。(Capture Response)
对话 2,
甲: 我要给你 100 元钱,你要不要? (Authorize Request)
乙: 好的,我先在我的小本本上记下: 甲要给我 100 元钱。 (Authorize Response)
甲: 我为什么要给你 100 元钱呢? 我逗你玩的。 (Void Request)
乙: 嗯,我先从我的小本本上划掉这笔钱, 我不差你这 100 元钱 (有多远滚多远...)。(Void Response)
对话 3,
甲: 我要给你 100 元钱,你要不要? (Authorize Request)
乙: 好的,我先在我的小本本上记下: 甲要给我 100 元钱。 (Authorize Response)
等了很长的时间...
乙: 这个甲说话不算话,我等了这么久,他也没有给我 100 元钱, 算了我从我的小本本上划掉这笔钱。 (甲尼玛去死吧...)。(Authorize Expired)
从上面的三段对话中,我们大概能够了解到 authorize/capture/void 这三个 API 的各自作用,以及他们之间组合使用能够达到的功效。
authorize 的使用方式和 purchase 差不多,authorize 不会做实际的支付,但是它会产生一个支付事务的 identifier, 这个 identifier 可以 给 capture 或者 void 使用, 如果给 capture 使用,远程支付网关就会对 identifier 所代表的支付事务做真实的扣款,如果给 void 使用,则远程支付网关 会撤销 identifier 所代表的支付事务。authorize/capture/void 这三个 API 的定义如下所示:
def authorize(amount, payment_method, options={}) #=> Response
def capture(amount, identifier, options={}) #=> Response
def void(identifier, options={}) #=> Response
在实际的开发中,我们可以将 authorize 和 void 结合起来使用以达到测试的目的,比如我们在测试支付的时候可以先调用 authorize,然后再调用 void, 这样可以在 不浪费金钱的情况下,达到和真实支付等价的测试效果,单然前提是支付网关提供这两个 api 所需要的功能。
1.3 store/unstore/update
在前面我们介绍过 purchase 的参数: payment_method 有四种形式,其中一种是 String/token, 这个 token 可以通过调用 store API 得到。既然可以生成 token,那么我们也可以 删除和更新 token, 这分别需要用到 unstore 和 update 两个 API。store/unstore/update 三个 API 的定义如下:
def store(payment_method, options={}) #=> Response
def unstore(token, options={}) #=> Response
def update(token, payment_method, options={}) #=> Response
2. ActiveMerchant 架构
一图胜千言,对于 ActiveMerchant 的架构我们给出一张图。
3. ActiveMerchant 集成案例
在实际的开发中,实现一个 activemechant 的 gateway 不是一件简单的事情,往往需要根据项目自身的代码做很多额外的工作,接下来我们在 spree 的基础上 集成 PayU 的支付网关。
3.1 搭建 Spree 项目
参照 spree的搭建步骤,我们一步步搭建一个 my_store 项目
$ gem install rails -v 4.2.2
$ gem install spree
$ rails _4.2.2_ new my_store
$ spree install my_store  # 这里不需要 cd my_store
$ cd my_store
$ bundle
在 bundle 的时候出现了一个错误,
Bundler could not find compatible versions for gem "sprockets-rails":
  In Gemfile:
    spree (= 3.0.4) ruby depends on
      spree_frontend (= 3.0.4) ruby depends on
        sprockets-rails (~> 2.2) ruby

    web-console (~> 2.0) ruby depends on
      sprockets-rails (3.0.0)
我们可以在 Gemfile 里去掉 web-console 这个 gem, 然后:
$ bundle update
$ bundle install
接下来我们为 my_store 设置 spree,
$ rails g spree:install --sample=false --seed=false
$ bundle exec rake railties:install:migrations
$ bundle exec rake db:migrate
$ bundle exec rake db:seed
$ bundle exec rake spree_sample:load
默认情况下我们会有一个 admin 帐号:
Email [spree@example.com]:
Password [spree123]:
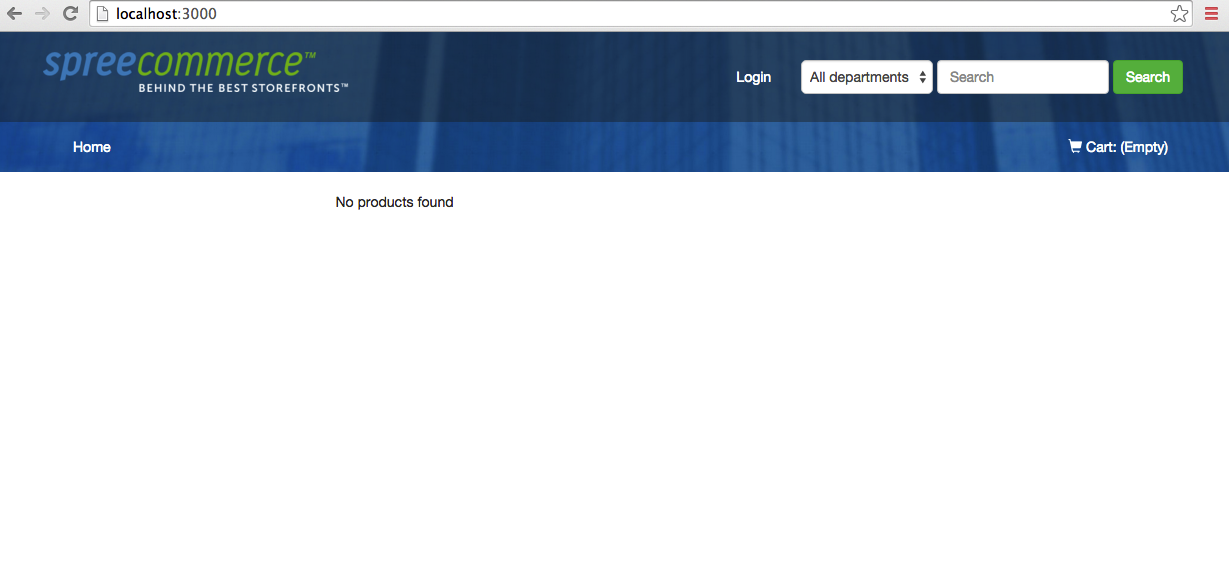
现在我们可以启动 my_store:
$ bundle exe rails s
用浏览器访问 http://localhost:3000/, 我们可以看到一个空空荡荡的线上商店:
我们可以到 my_store 的 app/models, app/controllers 和 app/views 目录下看看,发现空空如也,作为一名程序员顿时感到情况不秒,程序员最重要的职责就是把控细节,实现客户的各种刁钻问题 而如今 spree 把这些细节都丧心病狂地封装到了 Spree::Core::Engine 中去了:
# config/routes.rb
mount Spree::Core::Engine, :at => '/'
我不得不说这是一种不好的的做法,虽然 spree 号称提供了扩展方法比如 https://guides.spreecommerce.com/developer/extensions_tutorial.html, 但是用起来非常不自然,非常不方便, 作为一个 rails 项目,rails g controller xxx, rails g model xxx 是最方便自然的扩展手段, 我现在维护的一个基于 spree 的电商项目是
把 spree 的 core code 拷贝到 vendor 目录下, 如果需要扩展,需要把 vendor 下相关的 controller 和 model 拷贝到 app/controllers 和 app/models 下进再行扩展。我想 spree 之所以把实现细节都封装到
Spree::Core::Engine 中也许是为了把 spree 打造成一个开发电商项目的专有框架或者是为了让不是程序员的普通用户也能够很快上手,但是我感觉 spree 走错路了,其实 spree 如果不做过多封装而是作为一个普通的 rails 项目,开发人员通过 fork 其代码,然后再根据自身需求做进一步开发,这样会更好。顺便说下 Spree Commerce 已经不再维护 spree, 作为替代品可以使用 solidus 项目, solidus 是从 spree fork 出的一个项目。
前面我说了 spree 的不好,那么 spree 的好就是设计了一套比较好的电商流程,以及底层数据库。在此案例中,我会利用 spree 已经设计好的数据库和模型集成 PayU 支付网关。
3.2 Spree 的支付架构
一图胜千言语, 我们给出一张图:
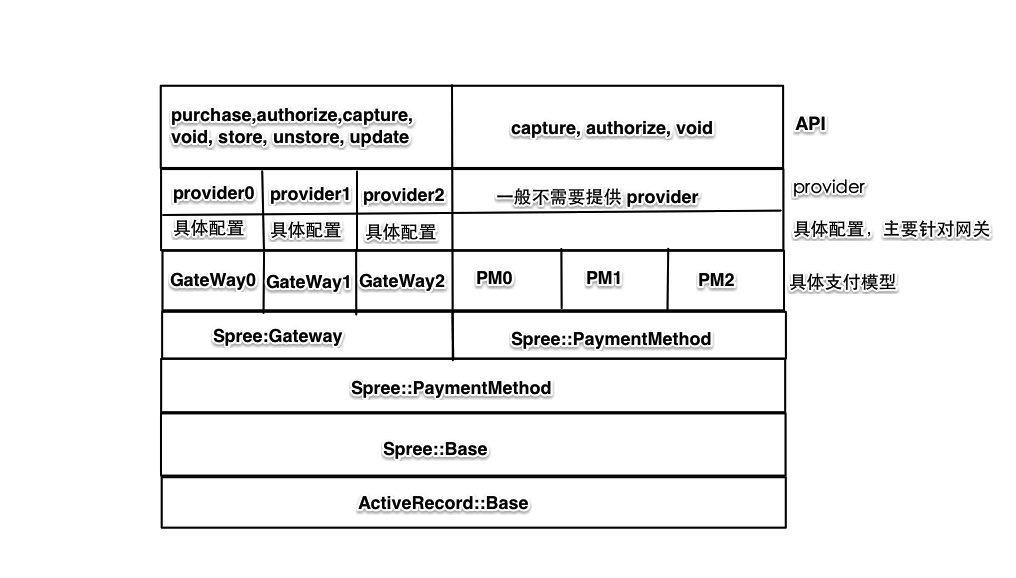
基于 spree 的电商项目中,支付方法有两类: 第一类需要需要请求远程支付网关, 第二类不需要请求远程支付网关,比如现金支付,银行转帐然后由客服确认等。 第一类支付方法在 spree 中叫 Spree::Gateway, 第二类支付方法在 spree 中叫 Spree::PaymentMethod, 但要注意的是 Spree::Gateway 是从 Spree::PaymentMethod 继承出来的,因为 Spree::Gateway 也是支付方法。Spree::Gateway 类型的支付方法需要提供一个 provider, 和远程支付网关交互的 api 都是在 provider 中实现的,当然有时候 provider 是支付方法本身,比如 Spree::Gateway::Bogous (一个伪造的支付方法,用于测试目的) 的 provider 就是其自身。 为了更详细的查看 spree 中和支付相关的代码,我们可以将 spree_core 的代码解压缩出来,
$ gem unpack spree_core
3.3 实现 PayU Gateway
由 Spree 支付架构图我们可以看出,实现 Spree::Gateway 类型的支付方法需要做以下一些工作:
-
创建一个具体的类,为了方便描述我们称此类为 A, 并且 A 继承于 Spree::Gateway。
-
在数据库中创建一条 spree_payment_methods 记录, 假设这条记录叫 m。
-
在数据库中为 m 创建相应的 spree_preferences 记录,这些记录主要用来配置支付网关的 api_key, api_login, currency 等数据。
-
为 A 实现一个 provider, 和远程支付网关交互的工作都在此 provider 中实现。
在实现 PayU Gateway 之前,我们先仔细阅读其文档: http://developers.payulatam.com/en/api/payments.html。
首先我们创建一个叫 Gateway::PayU 的类,
class Gateway::PayU < Gateway

  preference :api_key, :string
  preference :api_login, :string
  preference :account_id, :string
  preference :currency, :string
  preference :test, :string

  def provider_class
    ActiveMerchant::Billing::PayUGateway
  end

end
然后在数据库中创建 spree_payment_methods 和 spree_preferences 记录, 注意这里我们只以 Colombia 这个国家为例。
INSERT INTO spree_payment_methods (id, type, name, description, active, environment, zone_id, percentage, is_creditcard, created_at, updated_at, active_for,is_redirect)
VALUES (4000, 'Gateway::PayU', 'Credit Card (Colombia)', 'Production Colombia (PayU)', true, 'production', 54, 100, true, now(), now(), 'all', false);

INSERT INTO spree_preferences(name,owner_id, owner_type,  value) VALUES ('api_key', 4000, 'PaymentMethod', '6u39nqhq8ftd0hlvnjfs66eh8c');

INSERT INTO spree_preferences(name,owner_id, owner_type,  value) VALUES ('api_login', 4000, 'PaymentMethod', '11959c415b33d0c');

INSERT INTO spree_preferences(name,owner_id, owner_type,  value) VALUES ('account_id', 4000, 'PaymentMethod', '500538');

INSERT INTO spree_preferences(name,owner_id, owner_type,  value) VALUES ('merchant_id', 4000, 'PaymentMethod', '500238');

INSERT INTO spree_preferences(name,owner_id, owner_type,  value) VALUES ('currency', 4000, 'PaymentMethod', 'COP');

INSERT INTO spree_preferences(name,owner_id, owner_type,  value) VALUES ('test', 4000, 'PaymentMethod', 'test');
其中 api_key, api_login, account_id, merchant_id 都是由 PayU 提供的测试数据, 这些数据是公开的。 上线后,我们需要在生产数据库创建真实的 api_key, api_login, account_id, merchant_id 等。 这些配置信息都是通过 preference 方法传递到 Gateway::PayU 这个类里面的,比如:
class Gateway::PayU < Gateway
  preference :api_key, :string
  preference :api_login, :string
  preference :account_id, :string
  preference :currency, :string
  preference :test, :string
end

Gateway::PayU.new.preferences
最后我们实现 provider, 即 ActiveMerchant::Billing::PayUGateway 类, 这里我只给出这个类的框架,更详细的代码可能会因为项目的不同和不同。
module ActiveMerchant
  module Billing
    class PayUGateway < Gateway

      def initialize(options = {})
        requires!(options, :merchant_id, :api_key, :api_login, :account_id, :currency)
        @gateway_options = options
        @options = options
        super
      end

      def purchase(amount, creditcard, options = {})
        xml = build_purchase_xml(amount, creditcard, options)
        resp_xml = commit(xml)
        resp = parse_purchase_response(resp_xml)
        resp
      end

      def refund(authorization, options = {})
	    ...
	  end

	  ...

	end
  end
end