Rails + Grape API 开发实践
建立 demo 项目: topic-api
rails new topic-api
引入 grape
Gemfile
gem 'grape'
建立 api 目录
在项目的根目录下建立 api 目录, 和 API 相关的文件以后就可以放在此目录下了,
$ cd topic-api

$ mkdir app/api
API 会有多种,比如给 web 用,或者给 mobile 即手机客户端用, 我们现在要做的 API 是给 mobile 使用, 所以我们在 api 下建立一个 mobile 目录,
$ mkdir app/api/mobile
后面和 mobile API 相关的文件都应该放在 app/api/mobile 目录下面。
建立 Mobile::Base endpoint
Mobile::Base 主要有下面的作用:
- 本身作为一个节点被挂载到项目中
- 管理和挂载其他 API 节点(endpoint), 此时我们可以将 Mobile::Base 看作成一个存放 API 节点的容器
app/api/mobile/base.rb,
module Mobile
  class Base < Grape::API
    format 'json'
  end
end
现在 Mobile::Base 里没有挂载(mount)任何其他节点,我们先将 Mobile::Base 挂载到项目中去,
config/routes.rb,
Rails.application.routes.draw do
  mount Mobile::Base => '/api/mobile'
end
我们引入一个 task: api_routes.rake, 用它来打印和 API 相关的路由,
lib/tasks/api_routes.rake,
desc "API Routes"
task :api_routes => :environment do
  Mobile::Base.routes.each do |api|
    prefix = '/api/mobile'
    method = api.route_method.ljust(10)
    path = api.route_path
    puts "     #{method} #{prefix}#{path}"
  end
end
打印 API routes,
$ bundle exe rake api_routes
建立版本号和命名空间
一个可用性好的 API 应该具备下面一些特点:
- 有版本号
- 有含义清晰的命名空间
我们把首个版本的 API 命名为 V1, 建立 v1 目录,
$ mkdir app/api/mobile/v1
V1 既可以作为 API 的版本号,也可以作为 API 的命名空间, 更加具体的命名空间需要根据具体的 API 内容来建立。
Mobile::V1::ApiBase
Mobile::V1::ApiBase 作用相当于 Rails 中的 ApplicationController
app/api/mobile/v1/api_base.rb,
module Mobile
  module V1
    class ApiBase < Grape::API

         def self.inherited(subclass)

            subclass.class_eval do
              version 'v1', using: :path
              format :json

              before do
                Rails.logger.debug "===> params is: #{params.inspect}\n===> headers is: #{headers.inspect}"
              end
			end

    	 end

      end
    end
  end
end
我们在这里用到了 inherited 钩子,一旦有子类继承 Mobile::V1::ApiBase, inherited 钩子就会 被触发, 然后在钩子中,我们通过 subclass.class_eval 来扩展子类。
before 类似于 Rails 里的 before_filter, 任何继承于 ApiBase 的 API 类在都会在日志中记录 params 和 headers 信息,以方便开发调试。当部署到生产环境时我们需要把密码等敏感信息从 日志中过滤掉。
认证 API
认证就是识别用户,赋予权限
此处的认证 API 说简单点就是供用户登陆的。
认证 API 是非常通用的 API, 几乎每一个对外提供 API 服务的项目都需要实现认证 API.
建立 Authentications 命名空间,
$ mkdir app/api/mobile/v1/authentications
实现 token 认证
app/api/mobile/v1/authentications/token.rb,
module Mobile
  module V1
    module Authentications
      class Token < ApiBase
        namespace :authentications do

          desc 'Retrieve Authentication Token'
          params do
            requires 'login', type: String
            requires 'password', type: String
          end
          post 'token' do
          end

        end
      end
    end
  end
end
将 Mobile::V1::Authentications::Token 挂载到 Mobile::Base,
app/api/mobile/base.rb
module Mobile
  class Base < Grape::API
    format 'json'

 +  mount V1::Authentications::Token

  end
end
执行 bin/rake api_routes, 我们可以查看到 token API 的 url,
$ bin/rake api_routes
#=> POST       /api/mobile/:version/authentications/token(.:format)
我们注意下 namespace :authentications, url地址: /api/mobile/:version/authentications/token(.:format) 里的 authentications 就是由 namespace :authentications 生成的,我们可以注释掉 namespace :authentications, 然后查看 API 路由,
$ bin/rake api_routes
#=>   POST       /api/mobile/:version/token(.:format)
这时候 token API 的 url 少了 authentications。
token 认证的原理是什么呢?
目前登录的方式主要有下面几种:
- 用户名 + 密码
- 邮箱 + 密码
- 手机号 + 密码
- 以及各种第三方登录,比如 QQ 登录
为了方便描述,我们假设使用 用户名 + 密码 的方式进行登录, 认证以及请求服务的过程如下图所示,
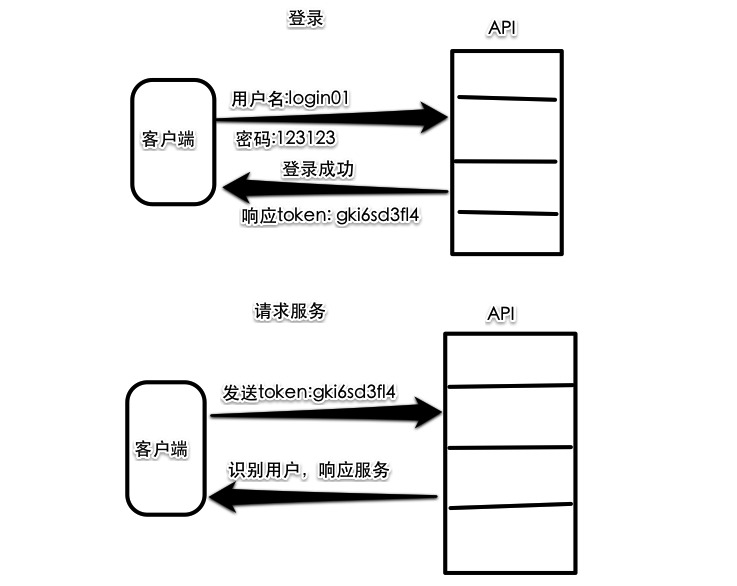
根据上面的流程图所示, 我们需要实现:
- 服务端验证用户名和密码是否匹配
- 服务端生成 token, 并返回给客户端
- 客户端在请求 API 服务时,将 token 发送给服务端, 服务端获取并解析此 token 以确认用户身份
- 确认用户身份,服务端响应服务
我们使用 bcrypt 这个 gem 来验证用户名和密码是否匹配
Gemfile,
gem 'bcrypt', '~> 3.1.7'
运行下面命令,
$ bundle install

$ bin/rails g model user name password_digest
user 模型必须有 password_digest 这个属性
app/models/user.rb,
class User < ActiveRecord::Base

  has_secure_password

end
has_secure_password 能够使 user 模型自动拥有一系列和用户验证相关的方法,
user = User.new(name: 'david', password: '', password_confirmation: 'nomatch')
user.save                                                       # => false, password required
user.password = 'mUc3m00RsqyRe'
user.save                                                       # => false, confirmation doesn't match
user.password_confirmation = 'mUc3m00RsqyRe'
user.save                                                       # => true
user.authenticate('notright')                                   # => false
user.authenticate('mUc3m00RsqyRe')                              # => user
User.find_by(name: 'david').try(:authenticate, 'notright')      # => false
User.find_by(name: 'david').try(:authenticate, 'mUc3m00RsqyRe') # => user
migrate,
$ bin/rake db:create
$ bin/rake db:migrate
users 表结构如下:
  create_table "users", force: :cascade do |t|
    t.string   "name"
    t.string   "password_digest"
    t.datetime "created_at",      null: false
    t.datetime "updated_at",      null: false
  end
创建一个开发用户,
user = User.create(name: 'login01', password: '123123', password_confirmation: '123123')

user.authenticate('123')    #=> false
user.authenticate('123123') #=> user
现在我们可以完成验证用户的工作了,
app/api/mobile/v1/authentications/token.rb,
module Mobile
  module V1
    module Authentications
      class Token < ApiBase
        namespace :authentications do

+          helpers do
+            def authenticate_name_and_password
+			  name = params[:login]
+              password = params[:password]
+              @user = User.find_by(name: name).try(:authenticate, password)
+            end
+          end

+          before do
+            raise 'authenticate error: invalid name or password' if !authenticate_name_and_password
+          end

          desc 'Retrieve Authentication Token'
          params do
            requires 'login', type: String
            requires 'password', type: String
          end
          post 'token' do
		    {resp_msg: 'success'}
          end

        end
      end
    end
  end
end
我们用 + 标注哪些增加的代码
在赋予客户端 token 之前,我们会验证用户名和密码是否匹配,若不匹配,我们会抛出 ‘authenticate error: invalid name or password’ 的错误。 现在这个错误类型有点笼统,我们会在后面对这个错误做进一步的细化。
现在我们来测试下 token API 工作起来是否符合我们的预期,
首先启动 Rails 服务,
$ bin/rails s
请求 token API,
$ curl -X POST -d "login=login01&password=123123" http://localhost:3000//api/mobile/v1/authentications/token

#=> {"resp_msg":"success"}%
查看 Rails 日志,没有异常抛出, 并且我们得到响应: {“resp_msg”:”success”}, 说明到目前为止 token API 的工作正常。
接下来我们会在服务端生成一个 token, 并将此 token 发送给客户端。那么怎么生成一个合适的 token 呢? 简单的做法是使用 uuid 生成一串唯一的字符串作为 token,然后将此字符串和用户的 id 关联起来, 在后续 的 API 请求中,客户端可以将此字符串发送给服务端作为识别用户的凭证。这种做法的安全性我们无法做出很好的评估, 所以我们决定参考一些大厂的做法,比如亚马逊的方法: http://docs.aws.amazon.com/AmazonS3/latest/dev/S3_Authentication2.html, 这篇文章介绍的认证流程如下:
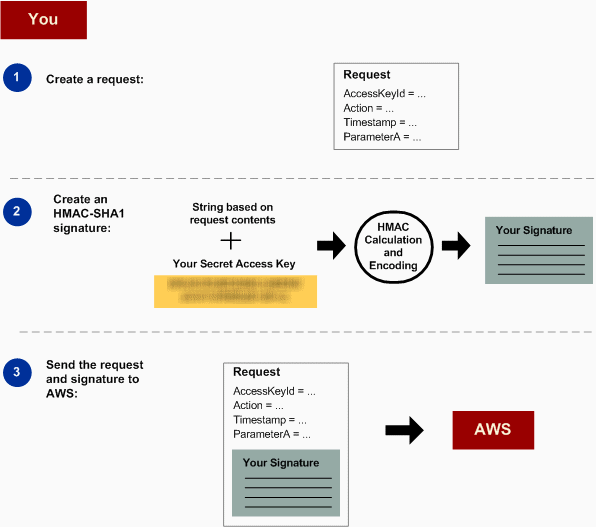
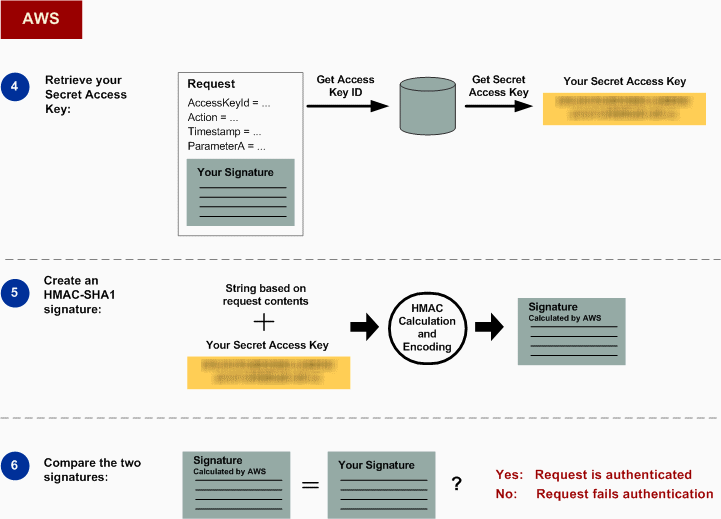
客户端,
- 首先创建一个请求,请求由 AccessKeyId, Action, Timestamp 等组成;
- 然后使用 HMAC-SHA1, 通过 Secrect Access Key 对请求内容进行签名, 将此签名叫做客户端签名;
- 最后将上面的请求和签名发送给服务端;
服务端,
- 接收到请求后,首先通过 AccessKeyId (从数据库)拿到 Secrect Access Key;
- 然后使用 HMAC-SHA1 通过此 Secrect Access Key 对请求内容进行签名, 将此签名叫做服务端签名;
- 最后将服务端签名和客户端签名进行比较,如果相等则认证成功,否则认证失败;
当然我们现在要做的工作和上述亚马逊的这个认证过程是有区别的, 首先我们的 API 不是公用的 API, 它只 供我们自己的手机 APP 使用,所以我们不需要做客户端签名来验证客户端是否合法,其次我们的认证是需要 识别出用户的,而不单是验证请求是否是来自合法的客户端 APP。亚马逊的认证流程对我们有以下一些参考:
- 我们可以将用户 id 和 AccessKeyId 对应起来;
- 我们需要为用户生成一个类似于 Secrect Access Key 的东西, 并且将它和用户关联起来;
- 我们生成的 token 会是一个类似于 HMAC-SHA1 签名与用户 id 组合成的东西;
- 服务端拿到 token 后,将 token 解析成两部分: 签名和用户 id, 我们可以把这个签名叫做客户端签名, 服务端根据用户 id 再生成一份服务端签名,然后比较两个签名是否相等;
- 如果两个签名相等,我们就可以通过包含在 token 中的用户 id 识别出当前登录用户;
创建 OauthToken 模型和 oauth_tokens 表
bundle exe rails g model OauthToken
app/models/oauth_token.rb,
class OauthToken < ActiveRecord::Base
end
oauth_tokens 表的结构如下所示:
class CreateOauthTokens < ActiveRecord::Migration
  def change
    create_table :oauth_tokens do |t|
      t.string :secret_key
      t.integer :user_id
      t.timestamps null: false
    end
  end
end
运行数据迁移任务:
bundle exe rake db:migrate
用于生成 secret_key 的方法:
class OauthToken < ActiveRecord::Base

  + def self.generate_secret_key
  +   Base64.encode64(Random.new.bytes(16))
  + end

end
用于生成 token 的方法:
class OauthToken < ActiveRecord::Base

  def self.generate_secret_key
    Base64.encode64(Random.new.bytes(16))
  end

  + def self.generate_token(secret_key, data)
  +   # 使用 secret_key 对 data 进行签名
  +   str = Base64.encode64(OpenSSL::HMAC.hexdigest('sha256', secret_key, data))
  +   # 将签名和 data 组合起来,然后用 Base64 编码并且去掉换行符号,最终生成 token
  +   Base64.encode64("#{data}::#{str}").gsub("\n", '')
  + end

end
在 token api 里响应客户端 token
方法名 authenticate_name_and_password 透漏了过多的实现细节,我们将其改名为: authenticate!, 并且将其业务逻辑转移到 User 模型里:
app/api/mobile/v1/authentications/token.rb
module Mobile
  module V1
    module Authentications
      class Token < ApiBase
        namespace :authentications do

          helpers do
         -   def authenticate_name_and_password
         -     name = params[:login]
         -     password = params[:password]
         -     @user = User.find_by(name: name).try(:authenticate, password)
         -   end

         +   def authenticate!
		 +	   error!('401 Unauthorized', 401) if !current_user
		 +	 end

         +   def current_user
		 +     @current_user ||= User.authorize!(env)
		 +	 end

          end

        -  before do
        -    raise 'authenticate error: invalid name or password' if !authenticate_name_and_password
        -  end

          desc 'Retrieve Authentication Token'
          params do
            requires 'login', type: String
            requires 'password', type: String
          end
          post 'token' do
		+   authenticate!
            {resp_msg: 'success'}
          end

        end
      end
    end
  end
end
在这里我们使用 - 标注移除的代码
app/models/user.rb
class User < ActiveRecord::Base

  has_secure_password

 + def self.authorize!(params)
 +   name = params[:login]
 +   password = params[:password]
 +   User.find_by(name: name).try(:authenticate, password)
 + end

end
调试认证用户成功:
$ curl -X POST -d "login=login01&password=123123" http://localhost:3000//api/mobile/v1/authentications/token

#=> {"resp_msg":"success"}%
调试认证用户失败:
我们把 login 设置为 notexist, 表示一个不存在的帐户,
$ curl -X POST -d "login=notexist&password=123123" http://localhost:3000//api/mobile/v1/authentications/token

#=> {"error":"401 Unauthorized"}%
为了向客户端响应一个可用的 token, 到目前为止, 我们需要完成以下几个步骤:
- 生成 secret key
- 通过 secret key 生成 token string
- 将 secret key 和 user id 关联起来,并保存到 oauth_tokens 表里
- 将 token string 发送给客户端
我们可以将 1 到 3 三个步骤的逻辑都放到 OauthToken 模型中去实现:
app/models/oauth_token.rb,
class OauthToken < ActiveRecord::Base

  + attr_accessor :token_string

  + attr_accessible :secret_key, :user_id

  + def self.create_with_user(user)
  +   data = [user.id, (Time.now.to_f * 1000).to_i].join('::')
  +   # 生成 secret key
  +   secret_key = generate_secret_key
  +   # 通过 secret key 生成 token string
  +   token_string = generate_token(secret_key, data)
  +   # 将 secret key 和 user id 关联起来,并保存到 oauth_tokens 表里
  +   token = create(secret_key: secret_key, user_id: user.id)
  +   # 将 token string 存储在 token.token_string 中,供后面发送给客户端
  +   token.token_string = token_string

  +   token
  + end

  def self.generate_secret_key
    Base64.encode64(Random.new.bytes(16))
  end

  def self.generate_token(secret_key, data)
    str = Base64.encode64(OpenSSL::HMAC.hexdigest('sha256', secret_key, data))
    Base64.encode64("#{data}::#{str}").gsub("\n", '')
  end

end
将 token string 发送给客户端:
app/api/mobile/v1/authentications/token.rb,
module Mobile
  module V1
    module Authentications
      class Token < ApiBase
        namespace :authentications do

          helpers do

	    def authenticate!
	      error!('401 Unauthorized', 401) if !current_user
	    end

	    def current_user
	      @current_user ||= User.authorize!(params)
	    end

          end

          desc 'Retrieve Authentication Token'
          params do
            requires 'login', type: String
            requires 'password', type: String
          end
          post 'token' do
	        authenticate!
          + token = OauthToken.create_with_user(current_user)
		  - {resp_msg: 'success'}
          + {resp_msg: 'success', token: token.token_string}
          end

        end
      end
    end
  end
end
现在我们调试下看是否能够拿到 token string,
curl -X POST -d "login=login01&password=123123" http://localhost:3000//api/mobile/v1/authentications/token

#=> {"resp_msg":"success","token":"MTo6MTQyOTY4MTM4MjUyNjo6TWpVellUUTNZbVJtTURneVkyTTJZbVk0TVRNeVpHRTNNVGxsTkRFMU1UQTBOVGc1WXpBNVlUQXhNakptCk56QTNPREE0TWpReVlqRmlaalJrWXpZeE53PT0K"}%
恭喜,我们拿到了 token string, 下一步就是使用此 token string 去验证用户。
在进一步的工作之前,我们需要对响应消息进行规范化调整, 以方便客户端的开发人员顺畅使用 api。
规范化主要包括以下几个方面:
-
响应消息体的结构应该一致
-
使用标准的 HTTP Status Code
-
响应消息体中应该包括客户端的请求信息
-
消息体中应该包括服务器的异常信息(细节信息),如果服务器确实发生了异常
-
对于已经知道的异常,应该将其实例化,并将实例化的异常发送给客户端
对于第 1 点不用多说,能够大大简化服务端和客户端程序的开发,这条规范无庸置疑是必须实施的。
对于第 2 点, 如果我们假设客户端的工程师熟悉标准的 HTTP Status Code, 那么这个能减少许多的
沟通成本, 另一方面 HTTP Status Code 的学习成本非常低,工程师能够很快的熟悉它。
对于第 3 点, 在调试 api 的过程中,客户端的工程师既可以使用此信息帮助自己调试程序,也能够很方便地 将这些信息发给服务端的工程师以帮助调试服务端的程序。
第 4 点的作用和第 3 点类似。
第 5 点的作用就是将异常和错误标准化,这样无论是服务端还是客户端都能根据标准化的错误异常做标准化的处理。
为此我们引入一个 helper 专门来处理上面的业务逻辑:
app/helpers/respond_helper.rb,
module ResponseHelper

  def generate_success_response(response_body, code = 200)
    message = build_response_message_body({}, response_body)
  end

  def generate_error_response(error, code = 500)
    error_data = {
      'error-code'  => error.class.name,
      'message'     => error.message
    }

    Rails.logger.info(error.backtrace.join("\n"))

    message = build_response_message_body(error_data, {})

    build_response(message, code, {'Content-Type' => 'application/json'})

  end


  private

  def request
    @request ||= Grape::Request.new(self.env)
  end

   def build_response(message, status, headers = {})
     Rack::Response.new([message], status, headers).finish
   end


  def request_info

    headers = request.env.select {|k,v| k.start_with? 'HTTP_'}
      .collect {|pair| [pair[0].sub(/^HTTP_/, ''), pair[1]]}
      .collect {|pair| pair.join(": ") << "<br>"}
      .sort

    {
      'href'         => request.url,
      'headers'      =>  headers,
      'query-params' => request.query_string,
      'body'         => request.body.read
    }
  end


  def build_response_message_body(error_data, response_body)
    {
      'meta' => {
        'code' => code,
        'error' => error_data,
        "x-server-current-time" => Time.now
      },
      'request' => request_info,
      'resposne' => response_body
    }
  end

end
首先我们看下 build_response_message_body 这个方法, 通过这个方法,我们对响应消息体的结构
一目了然:
    {
      'meta' => {
        'code' => code,
        'error' => error_data,
        "x-server-current-time" => Time.now
      },
      'request' => request_info,
      'resposne' => response_body
    }
meta 包括 code, error, x-server-current-time 3 个部分, code 都来自于标准的 HTTP
Status Code, error 包含了异常信息, x-server-current-time 包含了服务器的响应时间。
request 包含了客户端的 http 请求信息。
response 包含了服务端响应的数据。
generate_success_response 这个方法比较简单,我们就不做解释。
generate_error_response 这个方法中,我们注意看它怎么构造 error_data, 首先 error_data
包括两个部分: error-code 和 `message, error-code 中存放错误异常的类名,我们在前面讲过我们
会讲错误异常实例化就是为把错误异常放在此处发送给客户端, message 中存放错误异常异常的描述信息,
现在我们开始使用 ResponseHelper。
app/api/mobile/v1/api_base.rb,
module Mobile
  module V1
    class ApiBase < Grape::API

    +  Grape::Middleware::Error.send :include, ResponseHelper

      def self.inherited(subclass)
        super
        subclass.class_eval do
	+	  helpers ResponseHelper
          version 'v1', using: :path
          format :json

          before do
            Rails.logger.debug "===> params is: #{params.inspect}\n===> headers is: #{headers.inspect}"
          end

    +      rescue_from :all do |error|
    +        generate_error_response(error, 500)
    +      end

        end
      end

    end
  end
end
Grape::Middleware::Error.send :include, ResponseHelper 能够使我们在 rescue_from 里使用 ResponseHeler 里的方法。
helpers ResponseHelper 能够使我们在对应的 endpoint 里使用 ResponseHeler 里的方法。
我们目前还不知道会产生哪些异常,所以我们先使用 rescue_from :all 将所有异常捕捉住,然后使用
generate_error_response(error, 500) 将错误响应发送给客户端。
我们回到 token API, 当用户认证失败时,
app/api/mobile/v1/authentications/token.rb,
  def authenticate!
    error!('401 Unauthorized', 401) if !current_user
  end
在这里我们可以定义一个具体错误类型,比如 ApiError::Unauthorized, 为此我们建立一个 api_error.rb 文件用来存放这些错误和异常。
app/errors/api_error.rb
module ApiError

  Unauthorized = Class.new(StandardError)

  CODE = {
    Unauthorized: 401
  }

  def self.raise_error(error_class_name, error_msg = nil)
    error_class = const_get(error_class_name)
    raise error_class, error_msg
  end

  def self.get_code(error)
    CODE[error.class]
  end

end
修改 config/application.rb 文件,
module Topic
  class Application < Rails::Application
    + config.autoload_paths += [config.root.join("app/errors")]
  end
end
修改 app/api/mobile/v1/authentications/token.rb,
module Mobile
  module V1
    module Authentications
      class Token < ApiBase
        namespace :authentications do

          helpers do

	    def authenticate!
	      - error!('401 Unauthorized', 401) if !current_user
		  + ApiError.raise_error(:Unauthorized) if !current_user
	    end

	    def current_user
	      @current_user ||= User.authorize!(params)
	    end

          end

          desc 'Retrieve Authentication Token'
          params do
            requires 'login', type: String
            requires 'password', type: String
          end
          post 'token' do
	        authenticate!
            token = OauthToken.create_with_user(current_user)
            {resp_msg: 'success', token: token.token_string}
          end

        end
      end
    end
  end
end
修改 app/api/mobile/v1/api_base.rb,
module Mobile
  module V1
    class ApiBase < Grape::API

      def self.inherited(subclass)
        super
        subclass.class_eval do
	    helpers ResponseHelper
          version 'v1', using: :path
          format :json

          before do
            Rails.logger.debug "===> params is: #{params.inspect}\n===> headers is: #{headers.inspect}"
          end

        +  rescue_from ApiError::Unauthorized do |error|
        +    code = ApiError.get_code(error)
        +    generate_error_response(error, code)
        +  end

        +  rescue_from :all do |error|
        +    if error.is_a? ApiError::Base
        +      code = ApiError.get_code(error)
        +      generate_error_response(error, code)
        +    else
        +      generate_error_response(error, 500)
        +    end
        +  end

        end
      end

    end
  end
end
凡是在 app/errors/api_error.rb 里定义好的错误类型都可以通过 rescue_from 捕捉到,并做相应处理。
现在可以测试下我们的规范化错误处理机制是否起作用了, 我们使用一个不存在的帐号去请求 token api, 看看会发生什么,
$curl -i -X POST -d "login=notexist&password=123123" http://localhost:3000//api/mobile/v1/authentications/token
响应结果:
HTTP/1.1 500 Internal Server Error
Content-Type: application/json
Content-Length: 513
Cache-Control: no-cache
X-Request-Id: d8d28705-7864-46bd-8942-ea6a875b9e74
X-Runtime: 0.006540
Server: WEBrick/1.3.1 (Ruby/2.1.2/2014-05-08)
Date: Fri, 24 Apr 2015 12:09:25 GMT
Connection: Keep-Alive

{"meta"=>{"code"=>500, "error"=>{"error-code"=>"NoMethodError", "message"=>"undefined method `id' for nil:NilClass"}, "x-server-current-time"=>2015-04-24 20:09:25 +0800}, "request"=>{"href"=>"http://localhost:3000/api/mobile/v1/authentications/token", "headers"=>["ACCEPT: */*<br>", "HOST: localhost:3000<br>", "USER_AGENT: curl/7.24.0 (x86_64-apple-darwin12.0) libcurl/7.24.0 OpenSSL/0.9.8| zlib/1.2.5<br>", "VERSION: HTTP/1.1<br>"], "query-params"=>"", "body"=>"login=notexist&password=123123"}, "resposne"=>{}}
现在我们调试用户名和密码正确时,请求 token API, 是否会返回正确的 token:
修改 token.rb,
app/api/mobile/v1/authentications/token.rb,
module Mobile
  module V1
    module Authentications
      class Token < ApiBase
        namespace :authentications do

          helpers do

	    def authenticate!
          ApiError.raise_error(:Unauthorized) if !current_user
	    end

	    def current_user
	      @current_user ||= User.authorize!(params)
	    end

          end

          desc 'Retrieve Authentication Token'
          params do
            requires 'login', type: String
            requires 'password', type: String
          end
          post 'token' do
	        authenticate!
            token = OauthToken.create_with_user(current_user)
          -  {resp_msg: 'success', token: token.token_string}
		  +  generate_success_response({token: token.token_string}, 201)
          end

        end
      end
    end
  end
end
执行:
$curl -i -X POST -d "login=login01&password=123123" http://localhost:3000//api/mobile/v1/authentications/token
响应结果:
HTTP/1.1 201 Created
Content-Type: application/json
Content-Length: 615
Etag: W/"85bc2514ed10d579b17233be339381f2"
Cache-Control: max-age=0, private, must-revalidate
X-Request-Id: 45d297d9-3117-44b4-9484-c3ed59b9de22
X-Runtime: 0.222242
Server: WEBrick/1.3.1 (Ruby/2.1.2/2014-05-08)
Date: Fri, 24 Apr 2015 12:45:02 GMT
Connection: Keep-Alive

{"meta":{"code":201,"error":{},"x-server-current-time":"2015-04-24T20:45:02.481+08:00"},"request":{"href":"http://localhost:3000/api/mobile/v1/authentications/token","headers":["ACCEPT: */*\u003cbr\u003e","HOST: localhost:3000\u003cbr\u003e","USER_AGENT: curl/7.24.0 (x86_64-apple-darwin12.0) libcurl/7.24.0 OpenSSL/0.9.8| zlib/1.2.5\u003cbr\u003e","VERSION: HTTP/1.1\u003cbr\u003e"],"query-params":"","body":"login=login01\u0026password=123123"},"resposne":{"token":"MTo6MTQyOTg3OTUwMjQ3MDo6TTJWalltSXhZVEUwTnpSbVlUTXhNamcxWldNMFl6Y3hNalEwWlROaU9XRmlZMkkyTnprd1lXSXdNV0V5ClltVXpNRFkxTXpJMlpEQmxPV1kxT1RSaU53PT0K"}}
此时我们成功拿到了 token:
MTo6MTQyOTg3OTUwMjQ3MDo6TTJWalltSXhZVEUwTnpSbVlUTXhNamcxWldNMFl6Y3hNalEwWlROaU9XRmlZMkkyTnprd1lXSXdNV0V5ClltVXpNRFkxTXpJMlpEQmxPV1kxT1RSaU53PT0K
我们注意到无论是成功响应还是失败响应我们都能够得到一个结构一致的响应:
    {
      'meta' => {
        'code' => code,
        'error' => error_data,
        "x-server-current-time" => Time.now
      },
      'request' => request_info,
      'resposne' => response_body
    }
下面我们要做的是通过刚才拿到的 token 去请求其他的 api, 比如获取用户信息的 api: user_profile
使用 token 获取 user profile
创建 app/api/v1/user.rb 文件,
module Mobile
  module V1
    class User < ApiBase
      namespace :user do
        desc 'Get Current User Profile'
        get 'user_profile' do
          data = {}
          generate_success_response(data, 200)
        end
      end

    end
  end
end
挂载 user.rb 文件:
app/api/mobile/v1/base.rb,
module Mobile
  class Base < Grape::API
    format 'json'

    mount V1::Authentications::Token
  + mount V1::User

  end
end
现在 user.rb 文件还只是一个框架,并没有实际作用,我们需要在其内部实现以下功能:
-
获取并解析客户端送过来的 token
-
验证用户若成功,则返回 user profile
-
验证用户若失败, 则返回验证失败信息
客户端将 token 放在叫 Http-X-Authentication-Token 的 HTTP 头里发给服务端,
app/api/v1/user.rb,
module Mobile
  module V1
    class User < ApiBase
      namespace :user do
        desc 'Get Current User Profile'
        get 'user_profile' do
          data = {}
      +    token = request.headers['Http-X-Authentication-Token']
      +    ApiError.raise_error(:Unauthorized) if token.blank?

          generate_success_response(data, 200)
        end
      end

    end
  end
end
$ curl -i --header "Http-X-Authentication-Token: MTo6MTQyOTg3OTUwMjQ3MDo6TTJWalltSXhZVEUwTnpSbVlUTXhNamcxWldNMFl6Y3hNalEwWlROaU9XRmlZMkkyTnprd1lXSXdNV0V5ClltVXpNRFkxTXpJMlpEQmxPV1kxT1RSaU53PT0K" http://localhost:3000//api/mobile/v1/user/user_profile
没有异常抛出,说明我们顺利拿到了 token。
接下来解析token,
app/api/v1/user.rb,
module Mobile
  module V1
    class User < ApiBase
      namespace :user do
        desc 'Get Current User Profile'
        get 'user_profile' do
          data = {}
          token = request.headers['Http-X-Authentication-Token']
          ApiError.raise_error(:Unauthorized) if token.blank?

	   +  # base64 解码 token, 并且将 token 分为 [<user id>, <timestamp>, <签名>]
       +  raw_data = Base64.decode64(token).split('::')
	   +  # raw_data = [<user id>, <timestamp>, <签名>]
       +  @user = ::User.find_by_id(raw_data[0])
       +  ApiError.raise_error(:Unauthorized) if @user.nil?
       +  oauth_token = OauthToken.where(user_id: @user.id).order('created_at DESC').first
       +  ApiError.raise_error(:Unauthorized) if oauth_token.nil?

       +  service_token = oauth_token.generate_token(raw_data[0..1])

       +  ApiError.raise_error(:Unauthorized) if token != service_token

       +  generate_success_response(data, 200)

        end
      end

    end
  end
end
app/models/oauth_token.rb,
class OauthToken < ActiveRecord::Base

  attr_accessor :token_string

  def self.create_with_user(user)
-    data = [user.id, (Time.now.to_f * 1000).to_i].join('::')
+   data = [user.id, (Time.now.to_f * 1000).to_i]
    secret_key = generate_secret_key
    token_string = generate_token(secret_key, data)
    token = create(secret_key: secret_key, user_id: user.id)
    token.token_string = token_string

    token
  end

  def self.generate_secret_key
    Base64.encode64(Random.new.bytes(16))
  end

  def self.generate_token(secret_key, data)
+   data = data.join('::')
    str = Base64.encode64(OpenSSL::HMAC.hexdigest('sha256', secret_key, data))
    Base64.encode64("#{data}::#{str}").gsub("\n", '')
  end

+  def generate_token(data)
+    self.class.generate_token(self.secret_key, data)
+  end

end
$ curl -i --header "Http-X-Authentication-Token: MTo6MTQyOTg3OTUwMjQ3MDo6TTJWalltSXhZVEUwTnpSbVlUTXhNamcxWldNMFl6Y3hNalEwWlROaU9XRmlZMkkyTnprd1lXSXdNV0V5ClltVXpNRFkxTXpJMlpEQmxPV1kxT1RSaU53PT0K" http://localhost:3000//api/mobile/v1/user/user_profile
响应成功:
HTTP/1.1 200 OK
Content-Type: application/json
Content-Length: 613
Etag: W/"458b334db52bfbceb761f5c2199b304d"
Cache-Control: max-age=0, private, must-revalidate
X-Request-Id: 471a3c55-1d6c-4530-9600-26bae2a89ab7
X-Runtime: 0.100690
Server: WEBrick/1.3.1 (Ruby/2.1.2/2014-05-08)
Date: Fri, 24 Apr 2015 15:56:21 GMT
Connection: Keep-Alive

{"meta":{"code":200,"error":{},"x-server-current-time":"2015-04-24T23:56:21.162+08:00"},"request":{"href":"http://localhost:3000/api/mobile/v1/user/user_profile","headers":["ACCEPT: */*\u003cbr\u003e","HOST: localhost:3000\u003cbr\u003e","HTTP_X_AUTHENTICATION_TOKEN: MTo6MTQyOTg3OTUwMjQ3MDo6TTJWalltSXhZVEUwTnpSbVlUTXhNamcxWldNMFl6Y3hNalEwWlROaU9XRmlZMkkyTnprd1lXSXdNV0V5ClltVXpNRFkxTXpJMlpEQmxPV1kxT1RSaU53PT0K\u003cbr\u003e","USER_AGENT: curl/7.24.0 (x86_64-apple-darwin12.0) libcurl/7.24.0 OpenSSL/0.9.8| zlib/1.2.5\u003cbr\u003e","VERSION: HTTP/1.1\u003cbr\u003e"],"query-params":"","body":""},"resposne":{}}
为了证明 token 被正确识别,我们需要使用一个非法的 token 来测试:
$ curl -i --header "Http-X-Authentication-Token: xxxx" http://localhost:3000//api/mobile/v1/user/user_profile
在这个测试中,我们把 token 设置为 xxxxxx, 响应失败:
HTTP/1.1 401 Unauthorized
Content-Type: application/json
Content-Length: 513
Cache-Control: no-cache
X-Request-Id: b9479944-e76a-45a0-99fd-a00ee66a456f
X-Runtime: 0.083750
Server: WEBrick/1.3.1 (Ruby/2.1.2/2014-05-08)
Date: Fri, 24 Apr 2015 16:02:13 GMT
Connection: Keep-Alive

{"meta"=>{"code"=>401, "error"=>{"error-code"=>"ApiError::Unauthorized", "message"=>"ApiError::Unauthorized"}, "x-server-current-time"=>2015-04-25 00:02:13 +0800}, "request"=>{"href"=>"http://localhost:3000/api/mobile/v1/user/user_profile", "headers"=>["ACCEPT: */*<br>", "HOST: localhost:3000<br>", "HTTP_X_AUTHENTICATION_TOKEN: xxxx<br>", "USER_AGENT: curl/7.24.0 (x86_64-apple-darwin12.0) libcurl/7.24.0 OpenSSL/0.9.8| zlib/1.2.5<br>", "VERSION: HTTP/1.1<br>"], "query-params"=>"", "body"=>""}, "resposne"=>{}}
这说明我们对 token 的解析是正确的。
最后我们返回 user profile,
app/api/mobile/v1/user.rb,
module Mobile
  module V1
    class User < ApiBase
      namespace :user do
        desc 'Get Current User Profile'
        get 'user_profile' do
      -   data = {}
      -   generate_success_response(data, 200)
	  +   generate_success_response({id: @user.id, name: @user.name}, 200)
        end
      end

    end
  end
end
$ curl -i --header "Http-X-Authentication-Token: MTo6MTQyOTg3OTUwMjQ3MDo6TTJWalltSXhZVEUwTnpSbVlUTXhNamcxWldNMFl6Y3hNalEwWlROaU9XRmlZMkkyTnprd1lXSXdNV0V5ClltVXpNRFkxTXpJMlpEQmxPV1kxT1RSaU53PT0K" http://localhost:3000//api/mobile/v1/user/user_profile
成功返回 user profile:
{"meta":{"code":200,"error":{},"x-server-current-time":"2015-04-25T00:06:52.119+08:00"},"request":{"href":"http://localhost:3000/api/mobile/v1/user/user_profile","headers":["ACCEPT: */*\u003cbr\u003e","HOST: localhost:3000\u003cbr\u003e","HTTP_X_AUTHENTICATION_TOKEN: MTo6MTQyOTg3OTUwMjQ3MDo6TTJWalltSXhZVEUwTnpSbVlUTXhNamcxWldNMFl6Y3hNalEwWlROaU9XRmlZMkkyTnprd1lXSXdNV0V5ClltVXpNRFkxTXpJMlpEQmxPV1kxT1RSaU53PT0K\u003cbr\u003e","USER_AGENT: curl/7.24.0 (x86_64-apple-darwin12.0) libcurl/7.24.0 OpenSSL/0.9.8| zlib/1.2.5\u003cbr\u003e","VERSION: HTTP/1.1\u003cbr\u003e"],"query-params":"","body":""},"resposne":{"id":1,"name":"login01"}}%
这样我们通过 token 就识别出了用户。
小结
该篇博文主要做了以下的一些实践:
-
实施 grape api version;
-
组织好 grape api 文件的结构;
-
统一处理 grape api 异常错误;
-
在 grape api 中使用 token 验证用户;
-
在 grape api 中构造结构一致的响应;